Pop top Molding for all CHC tops

$5.32$5.63 per ft

Pop-Top Seal for all CHC Pop-Tops. It is a one piece extruded seal which should solve the separation problem found on other aftermarket seals which are glued together. We would recommend, to clean and wax where the seal comes into contact with the body. Additionally, it is helpful to spray the seal with silicone spray to keep the two surfaces from sticking to each other, keeping the in place and not detaching from the Pop Top.

Tech tip: You will need to measure around your top and add one foot. It is better to be long than short. A little silicone is needed. Once you have removed the old molding with a razor, start at the center of the rear of the top. Then roll the molding on. Do not stretch it on. The molding will shrink and you do not want a gap in the rear. Once you have rolled the molding to the rear of the top you will go beyond the starting point about 2 inches, then cut the excess. Peel back the molding about 2 feet and re-roll the molding pushing it back as you roll to make it fit tightly together. If you cannot get the molding to meet, then cut the excess in small increments, peel back molding about 2 feet and re-roll.

Continue this procedure until the ends meet tightly. Then peel back the molding about 6″ on both ends, add silicone to the edge of the top and re-roll the molding on to the top. The silicone will keep the molding from shrinking and causing a gap in the rear. After you have installed the molding get a pair of pliers and tape the ends; The tape will keep the pliers from cutting the molding, squeeze the part of the molding that attaches to the top every 6″ to 12″. There are aluminum clips inside the molding that will bend and grip it to the top.

$4.00/ft (up to 30 ft) plus fees.

CA
Price 4
Tax 0.29
Paypal Fee 1.34
TOTAL 5.63
Outside CA
Price 4
Paypal Fee 1.34
TOTAL 5.34

For international orders, contact us.

SKU: N/A Categories: ,

Description

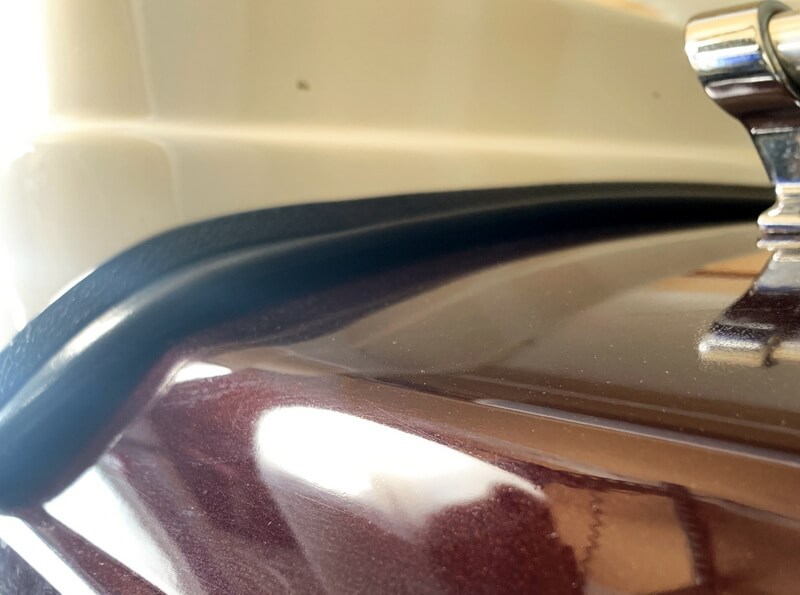
A little silicone is needed. Once you have removed the old molding with a razor blade, start at the center of the rear of the top. Then roll the molding on. Do not stretch it on. The molding will shrink and you do not want a gap in the rear. Once you have rolled the molding to the rear of the top you will go beyond the starting point about an 4 inches, then cut the excess. You can use a rubber mallet to tap the molding up so the plastic edge goes deep into the trim. Peel back the molding about 2 feet and re-roll the molding pushing it back as you roll to make it fit tightly together . If you can not get the molding to meet, then cut the excess in small increments, peel back molding about 2 feet and re-roll. Continue this procedure until the ends meet tightly

Peel back the molding about 6″ on both ends, add silicone to the edge of the top and re-roll the molding on to the top. The silicone will keep the molding from shrinking and causing a gap. After you have installed the molding get a pair of pliers and tape the ends; The tape will keep the pliers from cutting the molding, squeeze the part of the molding that attaches to the top every 6″ to 12″. There are aluminum clips inside the molding that will bend and grip it to the top.

Additional information

Location

CA, Outside CA

Reviews

There are no reviews yet.

Be the first to review “Pop top Molding for all CHC tops”

Your email address will not be published. Required fields are marked *

This site uses Akismet to reduce spam. Learn how your comment data is processed.